Posted: May 25th, 2008 | Author: xanda | Filed under: IT Related | Tags: howto, ubtunu 8.04, xmms | 49 Comments »
After Gentoo and Slackware, now is the time for Ubuntu removing XMMS packages from their repo. How SAD! And for those who still want XMMS installed in their Ubuntu, here is the tip.
This this is originally written by Sartek and modified by me
Update your packages list
Now install build-essential
sudo apt-get install build-essential |
sudo apt-get install build-essential
Alright, now we need to install the XMMS’s dependencies
sudo apt-get install autotools-dev automake1.9 libtool gettext libasound2-dev libaudiofile-dev libgl1-mesa-dev libglib1.2-dev libgtk1.2-dev libesd0-dev libice-dev libmikmod2-dev libogg-dev libsm-dev libvorbis-dev libxxf86vm-dev libxml-dev libssl-dev |
sudo apt-get install autotools-dev automake1.9 libtool gettext libasound2-dev libaudiofile-dev libgl1-mesa-dev libglib1.2-dev libgtk1.2-dev libesd0-dev libice-dev libmikmod2-dev libogg-dev libsm-dev libvorbis-dev libxxf86vm-dev libxml-dev libssl-dev
Now create a working directory and change into that directory
Download XMMS sources:
wget http://xmms.org/files/1.2.x/xmms-1.2.11.tar.gz |
wget http://xmms.org/files/1.2.x/xmms-1.2.11.tar.gz
Extract the file and enter the extracted directory
tar xvf xmms-1.2.11.tar.gz
cd xmms-1.2.11/ |
tar xvf xmms-1.2.11.tar.gz
cd xmms-1.2.11/
Run configure with –prefix=/usr
./configure --prefix=/usr |
./configure --prefix=/usr
In my case (Intel Pentium Core Duo), I’ve enable CFLAGS options for processor optimization
CFLAGS="-march=prescott -O2 -pipe -fomit-frame-pointer" ./configure --prefix=/usr --enable-gnutls=yes |
CFLAGS="-march=prescott -O2 -pipe -fomit-frame-pointer" ./configure --prefix=/usr --enable-gnutls=yes
You can simply use the command without the CFLAGS above, or if you want to optimize the pidgin to suit your processor, you can refer to Safe_Cflags page (Gentoo.. uhukk..)
Now compile it and install it
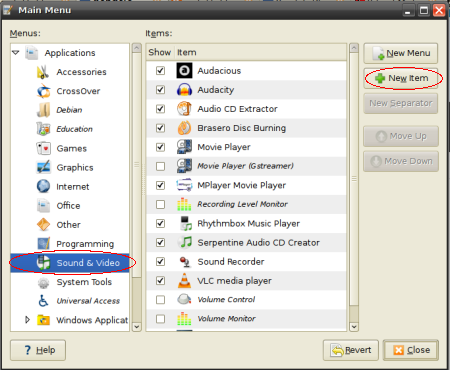
Now lets create the shortcut in your Gnome Menu
Right click on your Gnome Menu, and click on Edit Menu and follow these pictures:

Finish! now just simply remove your build (working) directory
Haih… Event XMMS is not in the repo… seriously Ubuntu 8.04 is a mistake!
Posted: May 17th, 2008 | Author: xanda | Filed under: IT Related | Tags: bandwidth, linux, optimize, tcp, tweak | 6 Comments »
Simply modify your sysctl file and poof!
sudo gedit /etc/sysctl.conf |
sudo gedit /etc/sysctl.conf
copy and past the following code at the last line on your sysctl file
# increase TCP max buffer size setable using setsockopt()
net.core.rmem_max = 16777216
net.core.wmem_max = 16777216

# increase Linux autotuning TCP buffer limits
# min, default, and max number of bytes to use
# set max to at least 4MB, or higher if you use very high BDP paths
net.ipv4.tcp_rmem = 4096 87380 16777216
net.ipv4.tcp_wmem = 4096 65536 16777216

# don't cache ssthresh from previous connection
net.ipv4.tcp_no_metrics_save = 1
net.ipv4.tcp_moderate_rcvbuf = 1

# recommended to increase this for 1000 BT or higher
net.core.netdev_max_backlog = 2500

# for 10 GigE, use this, uncomment below
# net.core.netdev_max_backlog = 30000
# Turn off timestamps if you're on a gigabit or very busy network
# Having it off is one less thing the IP stack needs to work on
#net.ipv4.tcp_timestamps = 0
# disable tcp selective acknowledgements.
net.ipv4.tcp_sack = 0

#enable window scaling
net.ipv4.tcp_window_scaling = 1 |
# increase TCP max buffer size setable using setsockopt()
net.core.rmem_max = 16777216
net.core.wmem_max = 16777216
# increase Linux autotuning TCP buffer limits
# min, default, and max number of bytes to use
# set max to at least 4MB, or higher if you use very high BDP paths
net.ipv4.tcp_rmem = 4096 87380 16777216
net.ipv4.tcp_wmem = 4096 65536 16777216
# don't cache ssthresh from previous connection
net.ipv4.tcp_no_metrics_save = 1
net.ipv4.tcp_moderate_rcvbuf = 1
# recommended to increase this for 1000 BT or higher
net.core.netdev_max_backlog = 2500
# for 10 GigE, use this, uncomment below
# net.core.netdev_max_backlog = 30000
# Turn off timestamps if you're on a gigabit or very busy network
# Having it off is one less thing the IP stack needs to work on
#net.ipv4.tcp_timestamps = 0
# disable tcp selective acknowledgements.
net.ipv4.tcp_sack = 0
#enable window scaling
net.ipv4.tcp_window_scaling = 1
tada… now run the following command
Posted: May 10th, 2008 | Author: xanda | Filed under: IT Related | Tags: active sync, linux, sync, sync in linux, ubuntu, wm5, wm6 | 12 Comments »
“ActiveSync is a synchronisation program developed by Microsoft. It allows a mobile device to be synchronized with either a desktop PC, or a server running Microsoft Exchange Server, PostPath Email and Collaboration Server, Kerio MailServer, Zimbra or Z-Push.” (Wikipedia, 2008)
But how to synchronize your Windows Mobile device in Linux? The solution for ActiveSync alternative on Linux is SynCE. The purpose of the SynCE project is to provide a means of communication with a Windows Mobile device from a computer running Linux, *BSD or other unixes using USB or Bluetooth. One can then use one’s computer to browse files, install applications and synchronize contacts, calendar and tasks with their PIM application of choice.
Lets setup it on our machine. This tutorial is working on Ubuntu 8.04 (Hardy).
First add SynCE repository to your sources.list
echo "deb http://ppa.launchpad.net/synce/ubuntu hardy main" | sudo tee -a /etc/apt/sources.list
echo "deb-src http://ppa.launchpad.net/synce/ubuntu hardy main" | sudo tee -a /etc/apt/sources.list |
echo "deb http://ppa.launchpad.net/synce/ubuntu hardy main" | sudo tee -a /etc/apt/sources.list
echo "deb-src http://ppa.launchpad.net/synce/ubuntu hardy main" | sudo tee -a /etc/apt/sources.list
Now update your packages list
As i mention before, Ubuntu 8.04 is a mistake. Ubuntu generic kernel might have some problems with USB driver. So here is the solution. First unload the old module
sudo rmmod rndis_host cdc_ether usbnet |
sudo rmmod rndis_host cdc_ether usbnet
Now, remove it
sudo rm /lib/modules/`uname -r`/kernel/drivers/net/usb/{rndis_host,cdc_ether,usbnet}.ko |
sudo rm /lib/modules/`uname -r`/kernel/drivers/net/usb/{rndis_host,cdc_ether,usbnet}.ko
Compile the new USB driver: usb-rndis-source and cdbs
sudo apt-get install usb-rndis-source cdbs
sudo module-assistant auto-install usb-rndis |
sudo apt-get install usb-rndis-source cdbs
sudo module-assistant auto-install usb-rndis
Fixed! Now back to SynCE story… We need to install several libraries which are odccm, librra0-tools and librapi2-tools
sudo apt-get install odccm librra0-tools librapi2-tools |
sudo apt-get install odccm librra0-tools librapi2-tools
Now connect your device and run the following command
IF you can see the lisft of files on your device, your device is successfully connected to your Linux machine.
BUT if it returns you the following error message, you need to install SynCE-GNOME or SynCE-KPM to provide a password prompt on device connect.
. WARNING **: synce_info_from_odccm: Failed to get a connection for <device_name>: Not authenticated, you need to call !ProvidePassword with the correct password. pls: Could not find configuration at path '(Default)' |
. WARNING **: synce_info_from_odccm: Failed to get a connection for <device_name>: Not authenticated, you need to call !ProvidePassword with the correct password. pls: Could not find configuration at path '(Default)'
To start sync your device, you need OpenSync.
sudo apt-get install multisync-tools opensync-plugin-evolution opensync-plugin-synce |
sudo apt-get install multisync-tools opensync-plugin-evolution opensync-plugin-synce
Wee..! Your device is ready to sync. Please refer to OpenSync page for tutorial on how to use OpenSync
For the official guide, please visit http://www.synce.org
Posted: May 8th, 2008 | Author: xanda | Filed under: IT Related | Tags: 2.4.1, compile, compile pidgin from source, pidgin, ubuntu, ubuntu compile pidgin | 4 Comments »
I’ve installed the latest pidgin (currently 2.4.1) using default repo from ubuntu 8.04 and i’ve found a bug. If my Yahoo Messenger buddy invisible and suddenly he/she appear online with status, I’m not be able to see they appear online until he/she change her/his status to available (with no status).
I’ve done several tests and finally come out with this solution: Compile it from source without ubuntu patch.
First, remove your old Pidgin configuration files and update your package list
rm -dfr ~/.purple
sudo apt-get update |
rm -dfr ~/.purple
sudo apt-get update
Now install build-essential
sudo apt-get install build-essential |
sudo apt-get install build-essential
Now install the Pidgin’s dependencies
sudo apt-get build-dep pidgin |
sudo apt-get build-dep pidgin
Ok.. you need to download the original pidgin source code
wget http://heanet.dl.sourceforge.net/sourceforge/pidgin/pidgin-2.4.1.tar.bz2 |
wget http://heanet.dl.sourceforge.net/sourceforge/pidgin/pidgin-2.4.1.tar.bz2
Extract the file and enter the extracted directory
tar -jxvf pidgin-2.4.1.tar.bz2
cd pidgin-2.4.1 |
tar -jxvf pidgin-2.4.1.tar.bz2
cd pidgin-2.4.1
Run configure with –enable-gnutls=yes because it is required for MSN and Google Talk
./configure --prefix=/usr --enable-gnutls=yes |
./configure --prefix=/usr --enable-gnutls=yes
In my case (Intel Pentium Core Duo), I’ve enable CFLAGS options for processor optimization
CFLAGS="-march=prescott -O2 -pipe -fomit-frame-pointer" ./configure --prefix=/usr --enable-gnutls=yes |
CFLAGS="-march=prescott -O2 -pipe -fomit-frame-pointer" ./configure --prefix=/usr --enable-gnutls=yes
You can simply use the command without the CFLAGS above, or if you want to optimize the pidgin to suit your processor, you can refer to Safe_Cflags page (yeah.. I’m a fanatic Gentoo user)
Now, run make and it will start compiling. Owh ya, it gonna takes some time
Finally, become root and run make install
Enjoy!~
Ubuntu 8.04 is a mistake!
Credits:
Thanks to Munzir, Adib and Yeh. They are my tester. Hahaha..
Gentoo wiki for the CFLAGS
Posted: April 24th, 2008 | Author: xanda | Filed under: IT Related, Jokes | Tags: progammer | 1 Comment »

[source: oscarrodriguezcarmona]